Repairs of Cracks in Epoxy Grouts 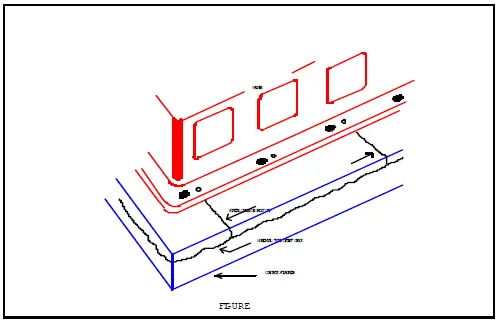
Most epoxy machinery grouts will develop cracks in long or wide epoxy grout caps if subject to different environmental temperatures. Two types of cracks are typical, vertical and horizontal, as shown in Figure 1.
Vertical cracks usually occur at a stress concentration point, such as an anchor bolt, a square corner, or jackscrew landing plate. Seal this type of crack to prevent oil or other fluid from penetrating the grout and contaminating the concrete below. With this precaution, cracks outside the machine or sole plate may not affect the ability of the grout to maintain the precision alignment of the grouted machine.
Horizontal cracks, if they occur, appear as a wavy line at the grout/concrete interface, 1/4" or 1/2" below the grout, in the concrete. While not considered as serious as vertical cracks, they nevertheless cause concern since they give the appearance that the whole grout cap has delaminated. Later, we will discuss this type of crack further.
While it is possible to formulate epoxy materials that will not crack, current technology does not allow these flexible compounds to perform properly as machinery grout, where fairly rigid materials are required to maintain long term precision alignment. Too much flexibility can cause the material to creep under sustained loading. Such dimensional changes could affect the alignment of engines, gas compressors and other precision machinery.
How to Repair Vertical Cracks
Good results in providing an oil-tight seal in cracks in the grout shoulder have been obtained by veeing out the crack, 1/4" wide, from the shoulder edge to the machine frame. This vee, located at the top of the crack, is then filled with a flexible sealer. Veeing can be done by using a grinder or by chipping. An alternate method is to use a router to cut a 3/8" wide x 1/8" deep groove along the crack. (See Figure 2). After creating the groove or vee, blow any dust out and keep it dry. Use a flexible sealer to fill the groove.
If there is water in the cracks, drying can be hastened by pouring a fast evaporating solvent such as acetone or methanol into the cracks. It should be a solvent that will dissolve in the water and carry water out as the solvent evaporates. Do not use a petroleum solvent that will leave a hydrocarbon residue. All solvents are potentially hazardous so follow good, safe application practices and the manufacturer's instructions.
Type of Sealant
The choice of sealant depends on the anticipated service and environmental conditions. If sealing the crack is primarily to prevent freeze/thaw damage, use a simple one-part industrial grade caulk, such as RTV silicone. If there will be continual lubricating oil spillage in the crack area, then a more oil-resistant, flexible sealant, such as Rowan Blue single package expansion joint sealer, must be used.
Follow the manufacturer's instructions on mixing (if any) and application. Masking tape along both sides of the prepared crack will help achieve a neat, straight sealant application and aid in clean up.
Alternate Vertical Crack Repair Method Using 2-Part Epoxy Injection
The method described above works well, particularly where the repaired cracks are needed to serve as expansion joints. Often, though, particularly when a foundation is inside a building, shaded from the sun and not subject to extreme temperature variations, an epoxy injection grout will make a very suitable repair. But a word of caution: if the force that caused the epoxy grout to crack in the first place is applied again (temperature changes, shrinkage, machine vibrations, settlement, etc.) to the repaired epoxy grout, another crack, adjacent to the first, will likely result.
Vee or rout out the top of the crack or leave it unchipped and build a 1/2" high dam of putty or "duct seal" on either side of the crack. (See Figure 2). Instead of sealing with a flexible caulk, use a two-part epoxy, such as a liquid epoxy injection grout, or the two liquid parts from a three-component epoxy foundation grout. Thinner than a sealing caulk, the liquid mixture (be sure to mix in proper proportions) can flow into the crack and will penetrate several inches. You may have to help the flow into the crack with a thin strip of shim stock, although the 1/2" fluid head also helps.
When using the putty dam, be sure to watch as the liquid epoxy starts to gel, and remove the 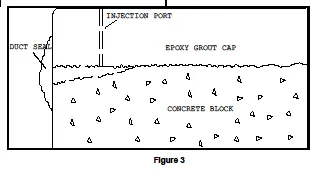 putty and excess epoxy with a putty knife before it hardens. Masking tape applied along the crack ahead of time, can also help in clean up.
If sealing of vertical cracks is being done in connection with an edge-lifting repair (covered in the next section), then the epoxy liquid repair or injection grout can be forced into the vertical cracks through drilled holes along the cracks, (See Figure 3), instead of using the small putty dam procedure.
Horizontal Edgelifting-Type Cracks
Horizontal cracks, as mentioned earlier, sometimes appear as wavy lines near or at the grout/concrete interface. Quite often, this type crack will be present if there are vertical cracks. If the grout cap is over 6" wider than the machinery base, edgelifting is likely to occur. This is worse at a large area, such as a corner where epoxy grout has been placed primarily for cosmetic purpose since there are no equipment loads there. In such cases, besides seeing the wavy lines on the vertical side, actual disbondment of the grout cap will be noticed either visually or by tapping. As you get closer to the equipment base, the grout bond will be intact since grout held in compression by the weight of the equipment and proper preload of the anchor bolts usually will not disbond. Disbondment of the grout shoulder is sometimes more pronounced in the vicinity of a vertical crack, even if the shoulder is narrower than 6".
Preventing edgelifting is easier than repairing it, and suggestions on how to limit all types of cracks in epoxy grouts were covered in earlier newsletters. Briefly though, chipping (chamfering) the edge of the concrete block 2" to 3" and using rebar dowels or wickets, as “Grout Locks” are two techniques that help, but most important is when forming for the grout pour, install Expansion Joints every 3 to 4 ft. and limit the width of the grout shoulder.
How to Repair Edgelifting Cracks
If the edgelifting is only a fine, wavy line without severe disbondment, simply sealing the vertical cracks and doing nothing about the horizontal cracks on the sides of the foundation is acceptable.
If disbondment is severe, the best cure is to remove the disbonded section and repour that area. A vertical saw cut with a masonry blade is used to define the bad area and assist in removing the loose cap. Repouring the area will result in a sound cap. In some cases, an expansion joint could even be added at the saw cut as further insurance or to break up a long run which should have had expansion joints in the first place.
A second method is to vertically drill 3/8" to 1/2" holes with masonry drills through the loose grout cap and force an epoxy injection grout (or unfilled grout liquid mixture) into the separation. A grease gun with a rubber lab bottle stopper is used to fit into the drilled hole, or a copper tubing standpipe with a funnel is used. The holes can be on 12" to 14" centers. As you approach the edge, look for a show of the epoxy liquid at the wavy line horizontal crack. Use "duct seal" or tape to retain the epoxy liquid until it sets.
All of the above methods for repairing both vertical and horizontal cracks have been used for years. The results have been good, oil-tight repairs that have extended the life of the grout and the machinery it supports. When it comes to precision machinery grouting, it is best to have a more rigid grout that has better support properties, even with the potential for cracking, than a grout that has been flexibilized too much. Cracks can be repaired, but a grout that compresses under load to the point where alignment is lost will have to be replaced.
Home > Newsletters > Repairs of Cracks in Epoxy Grouts

