Expansion Joints
Expansion joints are very important in epoxy grout pours as they serve to limit the cracking that can often occur in the grout. Cracks are the result, generally, of a curing stress that develops in the grout as it hardens.
Grouts generate heat after they are mixed and the chemical reaction starts. The hotter the exothermic chemical reaction (necessary to develop a high compressive strength grout) and the more heat there is from external sources (such as direct sunlight) the greater the stress that will develop in the grout.
If the stress does not exceed the tensile strength of the grout, no crack develops. However, if additional stress is added, as is very possible with a change in temperature, then the higher total stress is enough to cause a crack. That is why cracks sometimes develop months after installation. With a coefficient of expansion of more than twice that of concrete or steel, it is easy to see that temperature changes, such as a cold snap, can trigger enough additional stress to allow a crack to develop. Expansion joints will serve to break up the grout pours into smaller sections, thus reducing the probability of a crack.
Even with expansion joints, cracks can start from a stress concentration point, such as a sharp corner, so in addition to the use of expansion joints, elimination or treatment of all sharp corners should be called for. How to install expansion joints and reduce stress concentrations is the subject of this issue of the Grouting Technology Newsletter.
Location
Expansion joints, perpendicular to the crank shaft or long dimension of the block, should be laid out looking at a plan view of the foundation. An obvious point, such as a change in block width, could serve as a starting point, and additional joints could be added to break the pour into 3' to 4' sections.
The exact locations should be dictated by the equipment configuration rather than a rigid adherence to 3' to 4' distance criteria. Do not call for an expansion joint that will intercept a load bearing area such as a sole plate or chock, but instead move it over so the loaded section is equidistant between expansion joints. If in doubt, add an extra expansion joint. Ends of long metal rails are a logical place to put an expansion joint, since a rail that spans two or three anchor bolts needs to have room to grow thermally.
How to Construct
There are three ways commonly used to construct expansion joints in epoxy grout pours:
- Waxed wooden strips that are pulled out after the grout hardens and the gap then filled with an oil resistant elastomeric compound
- Styrofoam strips that are partially dissolved after the grout hardens and then sealed with an oil resistant elastomeric compound
- Closed cell oil resistant foam.
All three systems are easy to install if added at the time the forms are being constructed.
Expansion joints, in conjunction with full bed epoxy grouting, need only go from the edge of the block, across the grout shoulder and 2" to 3" back under the equipment frame. If the frame is elevated on metal, epoxy chocks or Rowan Tri- Chocks™, the expansion joints should go the full width of the grout pour.
With fabricated steel bases (skids) that are epoxy grouted to a concrete slab, common field practice has been to put expansion joints only in the shoulders, even if the grout bed extends 8' to 10' to the other side, unless there is access to the interior areas to install the elastomeric seal. Cracking is more likely to occur in the shoulder areas.
Pump bases are usually grouted without any expansion joints because of their smaller size and configuration.
Wooden Strips
Today, the most popular method of installing joints in epoxy grout caps is to use 1"- wide wood strips (redwood is preferred). The strips are attached to the forms and extend to the full depth of the epoxy grout pour, or pours if there is more than one pour.
The top ½" at the final grout elevation should be removable, although the 1/2" depth required for the oil resistant elastomeric seal can be chiseled out with difficulty. The wood should be sealed to the chipped concrete substrate elastomeric seal.(See Figure 1).
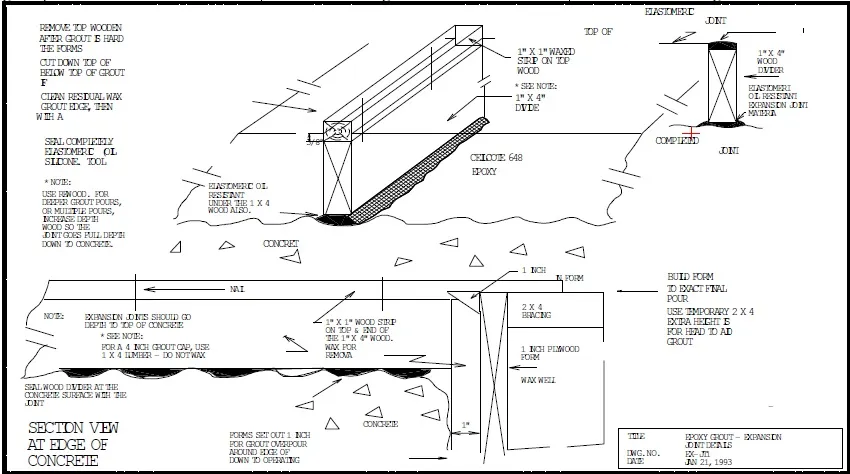
If the epoxy grout is going to be placed on the vertical edge of the concrete face (overpour) as well, the removable wooden strip should go down the sides. This will enable the elastomeric seal to go down the sides as well, completing the seal. (See Figure 2). After the epoxy grout has hardened, the 1/2" deep removable wood strip is pulled out and any wax cleaned from the edges of the grout. A new, single-package caulking tube of oil- resistant silicone (Rowan Blue™) is a good sealing compound. After cleaning the sides of the grout, put a piece of masking tape on the top of the remaining wood as a bond breaker and on either side of the grout cap to aid in clean up. For the best possible adhesion, prime the edges of the epoxy grout that will be in contact with the elastomeric silicone with an approved primer.
Next, seal the joint with the elastomeric sealer, carrying the seal down the vertical edge of the foundation as well. The single-package, oil-resistant silicone will tool off smoothly by using a little water on the trowel or putty knife. The above provides an optimum expansion joint design where the elastomeric seal has a cross section with the depth being 1/2 of the width and a bond breaker on top of the wood left in place. Such a properly installed expansion joint will allow for proper expansion and contraction of the grout without pulling loose.
Styrofoam Strips
This really is a variation of the step above. However, since styrofoam can be dissolved readily with acetone or other solvents, the top 1/4" or so can be dissolved and the joint sealed with an appropriate elastomeric compound as described in the step above. A word of caution, though: some epoxy grout formulations contain solvents themselves and so cannot be used with this method. Be sure to check the compatibility of the epoxy styrofoam ahead of time.
A better variation of the design is to set the foam 1/2" low using a removable wooden strip as in Method 1 and then completing the joint with an oil-resistant, elastomeric silicone.
This method is falling out of favor, as the styrofoam below can crush when someone steps on the joint, causing the seal to tear loose. We do not recommend using this method.
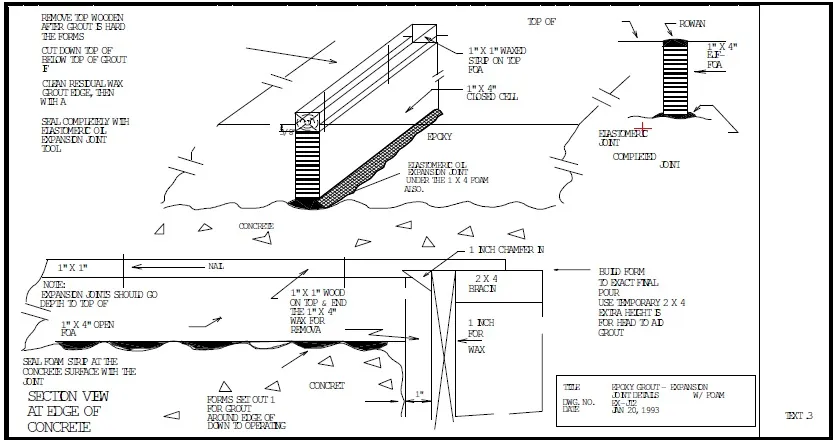
How to Install Closed Cell Oil Resistant Foam
Suitable foam materials of neoprene or urethane are available in 3/4" to 1" width stock. The depth should be approximately that of the grout depth and the length cut to fit the distance from the form edge to where the grout terminates at the equipment oil pan area.
The foam will tend to "snake" after installation. To control this, the foam should be fastened to a wooden strip that is nailed securely into the form. (See Figure 2). The top of the foam should be at the finished elevation of the grout with any excess being neatly trimmed.
An alternative is to use foam a 1/2" low with a removable wooden strip on top of the foam as in Method 1 and then completing the joint with an oil resistant elastomeric silicone.
A thicker 2" x 2" strip of foam works very well for skid mounted equipment. The foam strips should be sealed to the sharp corners of the equipment frame, if full bed grouted, or of a sole plate or rail can cause a crack to start. Good design calls for a 1 1/2" radius, or larger, to help alleviate the stress concentration. Metal plates that will be encased in the grout pour, such as a jackscrew landing plates, should be circular in design or have well rounded corners. If a sharp corner or edge is found during the pregrouting check, electrical putty or duct seal can be used to encase the sharp corner.
With a single pour of epoxy grout, rebar dowels should terminate 2" below the top surface. With a multiple pour, the rebar dowels should extend through the bottom layers and terminate 2" below the top surface of the final pour. Horizontal rebar should also have 2" of grout cover over them, or they, too, can cause a crack in the grout.
Formed interior corners, for example between compressor cylinders, should also have a generous 1 1/2" contour or radius in the grout. A piece of 3" PVC pipe can be cut and used at the forming stage to create the contour.
Finally, while not directly related to cracking from stress concentrations, the forms should also have a chamfer strip to break the sharp edges of the final grout pour.
Following the above recommendations will not guarantee that cracks will not develop but certainly will greatly reduce cracking no matter what brand of grout is used. If a crack does develop, it should be repaired, preferably before the crack becomes contaminated with oil. Hints on how to repair cracks will be provided in a subsequent newsletter.
A Good Suggestion
Regardless of which of the three methods is used, some grout suppliers suggest a layer of oil-resistant, elastomeric material at the bottom of the expansion joint as a “secondary seal.” This needs to be applied when installing the expansion joint at the form building stage.
Home > Newsletters > Expansion Joints

