Pump Grouting
This issue deals with a subject that is equally as important as the grouting of reciprocating machinery, yet is rarely covered in the installation bulletins of grout manufacturers. Some useful techniques for "two-level" pump grouting have been developed in the last few years, and they are yielding better performances than older techniques.
The term "two-level" pump grouting comes from the fact that many pump bases have grout 1½" to 2" thick under the lower base flange or skirt at the concrete foundation and then have a thicker section inside the inverted "U"-shaped pump base cavity that provides support for the pump and motor. (See Figure 1).
In this issue, we will highlight all the options available in pump grouting as currently practiced in the field to aid you in the selection of materials and techniques that are best suited to your particular conditions.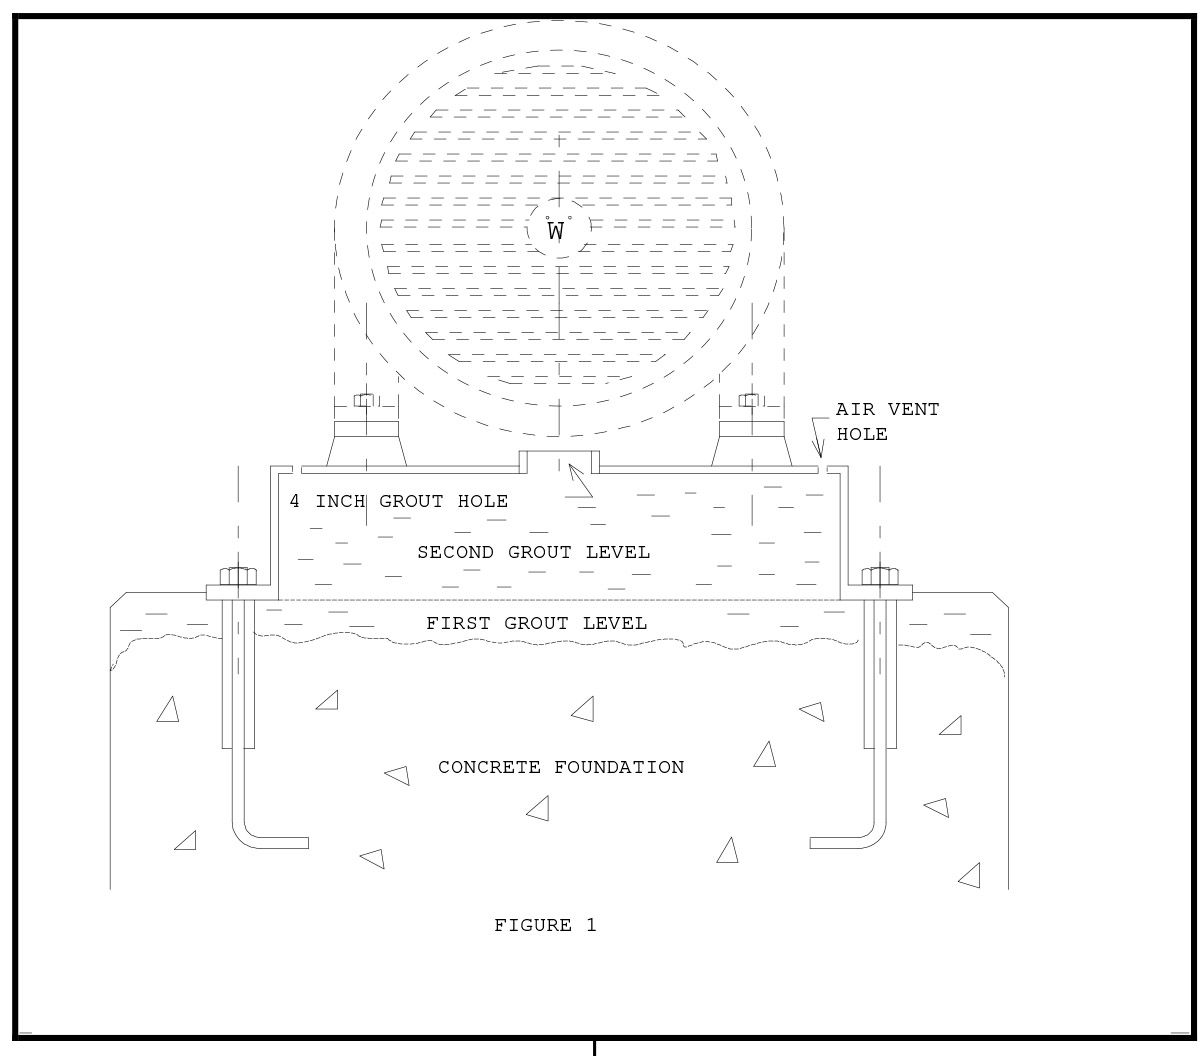
Why Grout Pumps
Pump bases, usually consisting of the pump and its driver, need to be grouted to the concrete foundation in order to provide a fully supported and properly leveled and aligned unit. As with other precision machinery, the concrete foundation as poured is not at a precise enough elevation or finish to simply bolt the base in place. Most pump bases furnished by equipment manufacturers need to be filled in their interior with grout to provide structural support, adequate stiffness, and to dampen harmonic vibration. A good criteria of the required stiffness for a pump base can be found in API610, Section 2.4. To meet the stiffness requirements, a fully grouted pump base in accordance with 2.4, Section 6 may be required.
Older cast iron bases were more massive and rigid than the newer fabricated steel bases but are not as common today because of their cost. This has made good grouting even more important than ever. Even bases fabricated to API610, which includes a stiffness criteria, still need to be properly grouted. Finally, higher speed pumps, particularly those with 3600 RPM drives, need a completely filled, well bonded internal grout pour to lessen harmonic vibration. If only one of the above requirements applies to a particular pump grouting application, good grouting techniques and materials need to be employed if minimum wear on the bearings, seals and couplings is to be expected over the life of the installation. Both Malcolm Murray1 and Perry Monroe2, in several articles, have defined how expensive poor pump grouting can be.
Types of Grout Available
While epoxy grouts are almost the universal choice for large reciprocating compressors and other precision machines, depending on the application, pump grouting can be successfully accomplished using either cementitious (inorganic grouts) or epoxy grouts (or other organic grouts).
With pumps below 25 horsepower, either cementitious or epoxy grouts can be used. Most engineers specify epoxy for the larger horsepower applications, or those where the corrosion resistance of an epoxy grout is required (or a polyester/vinylester grout in strong acid service). For high pressure or high RPM (3600 RPM) applications, where harmonic vibration is a strong consideration, epoxy grouts are again the most popular choice. Grouts for pumps should possess the following characteristics, since grouting pumps can be more complex and harder to accomplish than flat base equipment.
Cementitious Grouts
- Meets CRD C-621 at a flowable consistency.
- Provide one hour working time at 100° F.
Epoxy Grouts
- Flow 4 ft. horizontally with 3" clearance in 80 seconds.
- Provide good base plate contact at above flow.
- Have low exotherm at 6" to 8" thickness.
- Minimum of one hour working time at 100° F.
A few words of explanation of the above desired characteristics are in order. With respect to cementitious grouts, there is a goodCorps of Engineers specification, CRD C-621, available as a guide, thus making it easier to select the best cementitious grout for a particular application. A word of caution, though: many grout manufacturers list meeting CRD C-621 prominently in their literature but, in fact, only meet it when mixed to a "plastic" consistency. A "plastic" consistency is too stiff to be used for pump base grouting. A suitable cementitious grout must meet CRD C-621 at a flowable
consistency and not many proprietary brand grouts can do this. There are some, so be selective.
In addition to flow and the good base plate contact that CRD C-621 calls for, ample working time is a necessity. The criteria of one working hour at 100°F. is available in some brands, although it further reduces the list from those that meet the flow criteria. This will give you the necessary working time to completely fill a complex multiple cavity pump base even if the anticipated. temperatures during application are well below 100° F. In the Middle East, it is not uncommon to grout at night to take advantage of an 80° F. environment.
You may need 1-1/2 to 2 hours to properly place the grout, and usually a grout that allows one working hour a 100° F. will have 1-1/2 to 2 hours at 80° F. Don't compromise on working time for the sake of a few pennies saved in grout procurement. A discussion of the criteria for epoxy grouts suitable for pump base grouting requires the following explanation, since CRD C-621 does not apply and other proposed standards are still in the developmental stage at this writing. 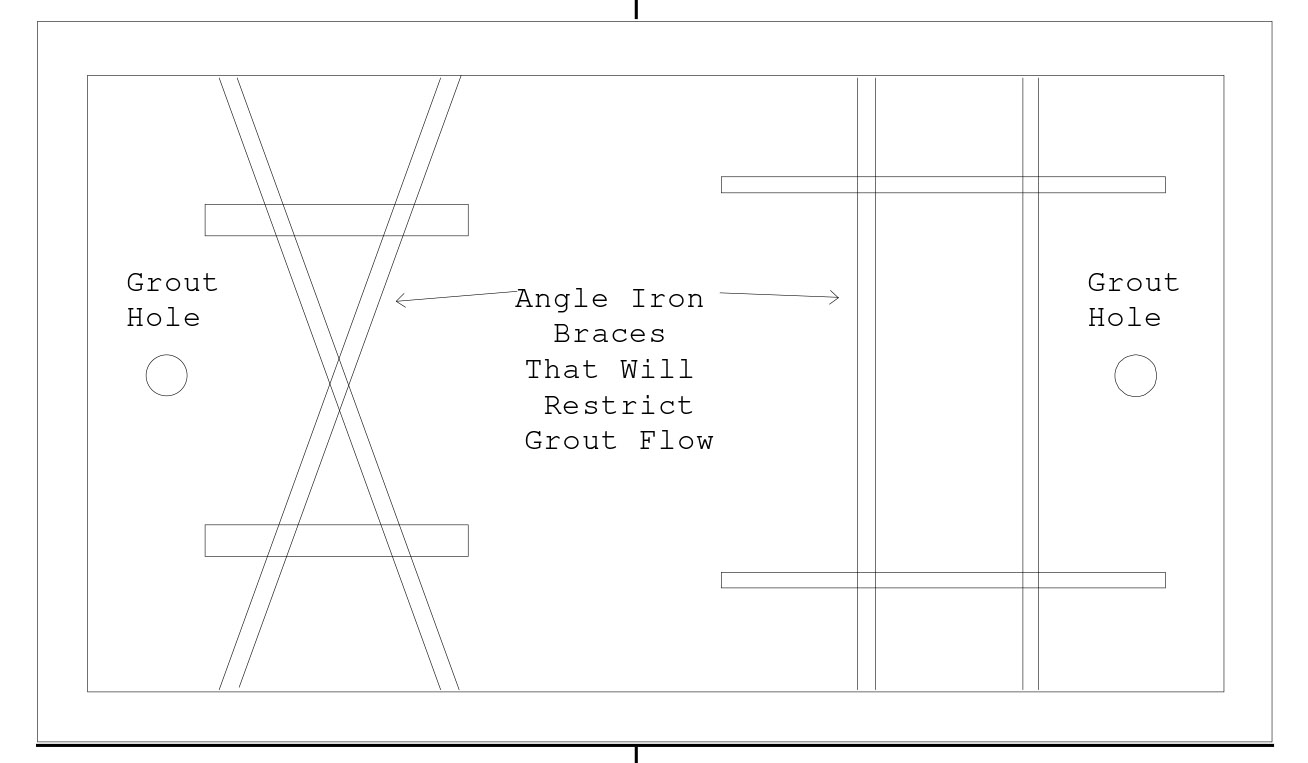
The inter-relationship between flow, base plate contact, and heat generated during curing (exotherm) is much more complex with epoxy grouts. Most epoxy machinery grouts are a very stiff mixture in order to get good base plate contact. Reducing the aggregate loading to increase flow usually increases air voids or bubbles that form on the underside of the equipment base. Simply taking a good epoxy machinery grout and leaving out some of the aggregate to meet the flow criteria required for pump cavity grouting will usually spell trouble in the form of air voids. A different aggregate with selected gradation is required.
On the plus side, epoxy grouts with strength two to three times that of cementitious grouts can usually provide the necessary support with much less bearing plate contact than a cement grout. The epoxies bond much better to a properly prepared steel pump cavity and so can easily compensate for less bearing plate contact. A good rule to follow is to always add the maximum amount of aggregate that can be added to the epoxy liquid mixture and still get the required flow. In hot weather, when the ingredients are hot, even extra aggregate may be called for to compensate for the lower viscosity that the liquid components exhibit as temperatures go up.
With regard to temperature, a criteria was listed for a low exotherm reaction temperature of an epoxy grout at 6" to 8" pour thickness, typical of pump cavity grouting. Obviously, common precautions used with all grouts, cementitious and epoxy, should be followed, such as keeping the grouting materials stored in a cool place prior to grouting and providing shade over the equipment at least 48 hours before grouting.
However, different epoxy grouts generate exothermic heats of reaction peculiar to their formulation, and selecting one with a low exotherm can be an advantage in pump cavity grouting. What happens during the curing of epoxy grouts and also with cementitious grouts, is that the heat generated causes both the steel pump base and the mass of epoxy grout in the pump cavity to expand. The higher the temperature, the more expansion there is. Epoxy grouts "set" or lose their fluidity while still hot. As they cool down, so does the steel pump base, of course.
Unfortunately, the epoxy material, with twice the coefficient of thermal expansion of the steel base, contracts twice as much as the steel does and can pull away from the underside of the base. This is why the precautions of shade, cool storage of materials and selection of a low exothermic curing epoxy grout are so important.
The last criteria on the epoxy grout list, a working time of one hour at 100° F., is available in commercial formulations with all the other criteria necessary for a good pump grout. The explanations given above for similar working time for cement grouts apply to the epoxy class of grouts, as well. Chances are, though, that your current standard epoxy machinery grout may not have all the additional characteristics needed for good pump grouting. You may need to write separate specifications for pump grouting.
Pre-Grouting Preparation
At this point, some of you may be thinking that all the above information about selecting the right grout is very nice, but "my problem is to install the grout we have on hand and make the best of it." O.K., this section will help you get the best pump grouting job possible with what you have to work with. You can take some precautions and do some things that will vastly improve the quality of the finished product. Taking action before the pump base is set in place prior to grouting will be time well spent. The following checklist, with brief explanations, is broken into two sections: the metal base itself and the concrete foundation.
Metal Pump Base
- Add a minimum of four ½"-diameter vent holes in each pump cavity compartment.
These vent holes are absolutely necessary to expel air as the cavity fills with grout. They also serve as a "tell tale" to let you know that
the grout has moved from the 4"-diameter (min.) pour hole to the point farthest away.
- Add a 4"-diameter (min.) fill hole into each grout compartment.
While these holes are usually provided by the pump base fabricator, they need to be in an accessible location where a 4" stand-pipe or funnel can be used to add the "head" necessary to cause the grout to flow across the cavity. If an inspection of the underside (always do this before lowering the base in place) shows cross bracing underneath the support plate (see Figure 2), perhaps notched to allow grout to flow over them at the corners, be prepared for trouble, since grout won't always flow around those braces. Instead, be sure there is a separate 4" fill hole for each compartment, or add one now.
- Add jackscrews to the pump base lower flange, if not provided.
While all pump bases will have the necessary holes for the required number of anchor bolts, some bases are still being provided without jackscrews for alignment purposes. Shim packs, popular years ago to provide the initial alignment until the grout sets, are more time consuming to use and should not be left in place once the grout cures anyway. It's simpler to eliminate them at this point and use jackscrews which can be backed off once the grout cures.
While you can get to the underside, it should be cleaned as required for the grout you'll be using. The purpose is to get the maximum bond possible between the grout and the pump base. You could even add bond enhancements at this point, such as tacked-in-place rebar or expanded metal, if suitable for the base and if needed as a further factor of safety where maximum bond is required. Any grout that you use will at least require that the base be "grease free" and clean! Sandblasting is the preferred method to prepare the base so that optimum bonding can be achieved. 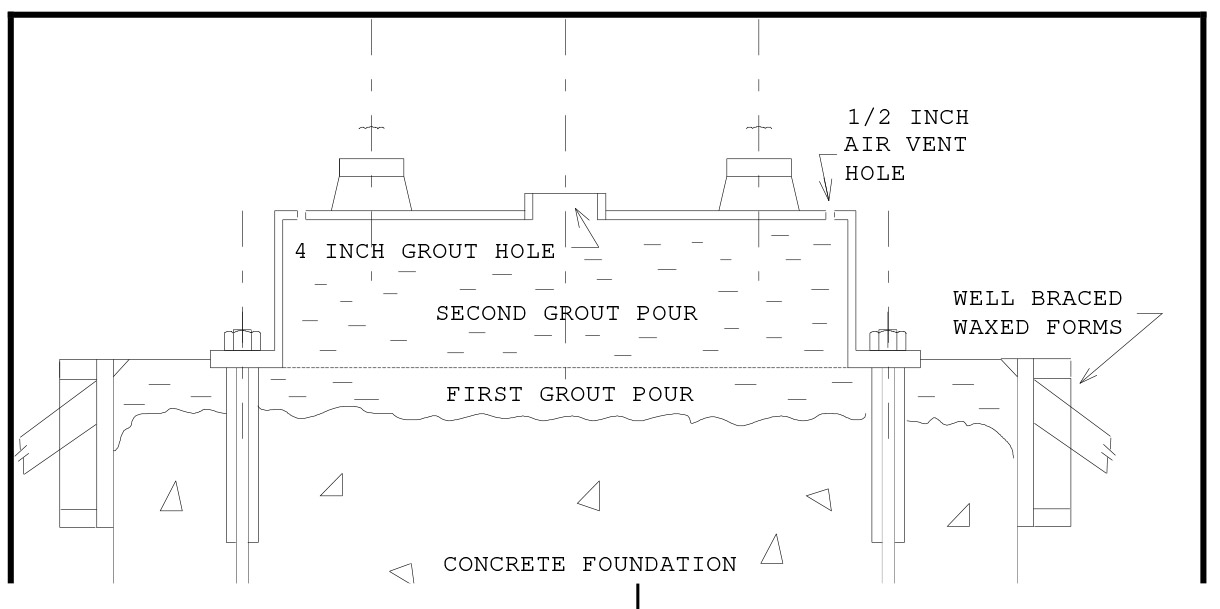
- Apply a protective coating system.
Some operating environmental conditions require that the base itself be coated or lined to withstand the spillage of process fluids. Consider extending the protection to the underside as well, as long as the protective coating system is compatible with the grout being used. Epoxy paint systems can be hard to bond to, even with an epoxy grout, so consider the use of the mechanical bond enhancements suggested above if the interior surfaces are to be painted.
- Remove the driver and the pump, if heavy.
The driver itself may have to be removed if it covers a grouting access hole or if the metal base is not stiff enough in the ungrouted state1 to support the driver without distortion.
- Protect finished support surface areas or pads from grout spillage.
Grouting is messy by nature, so protect the pump and driver mounting pads ahead of time with a heavy coat of wax. This will make later equipment installation easier. These are precision machined surfaces that must mate to the machine support feet.
Use these to encase the threads of jackscrews embedded in the grout or to seal the shim packs so they can be dug out later.
Concrete Foundation
- Chip the concrete surfaces.
All concrete that will be covered with grout, either cementitious or epoxy, should be chipped to remove the laitance from the concrete surface and expose the concrete aggregate.
- Provide shade from the sunlight or a shield from radiated process heat.
Shielding from sunlight or heat sources is necessary not only for proper equipment alignment but also to provide a moderate temperature during the grout installation and curing periods. A 48-hour shaded period before grouting and 24-hour period after grouting are good guidelines.
- Provide heat and shelter if cool or rainy.
Besides heat, rain or cool weather can ruin a grout job. Planning ahead here is just as important as planning for too much sun. However, be careful of condensation when warming a cold base.
- Pre-soak concrete or protect from water.
If a cementitious grout is to be used, plan ahead on how a 24-hour pre-soaking (with clear water) of the concrete can be accomplished. Be sure any bolt hole sleeves are sealed.
Caution
If you are using an epoxy grout, it is just as important to plan ahead on how you are going to keep the foundation bone dry from rain or process/wash down water. Alert the night operators and cover the base well. Don't trust luck and the weather forecast!
How to Form
While forms of wood are used with either epoxy or cementitious grouts, in "twolevel" pump grouting forming is very important depending on what installation technique will be used.
With either type grout, the choice is between a two-step pour (see Figure 3) or a one-step operation (see Figure 4). With a two-step pour, the first pour under the bottom base flange or perimeter is made across the top of the concrete foundation. This pour is allowed to set hard enough so that the higher hydrostatic head of the second pour in the pump base cavity will not dislodge the first pour.
If a one-step grouting operation is to be used, additional preparation and forms are required. Proponents² of this more complex installation technique feel the good results that have been obtained in the field justify the extra effort. 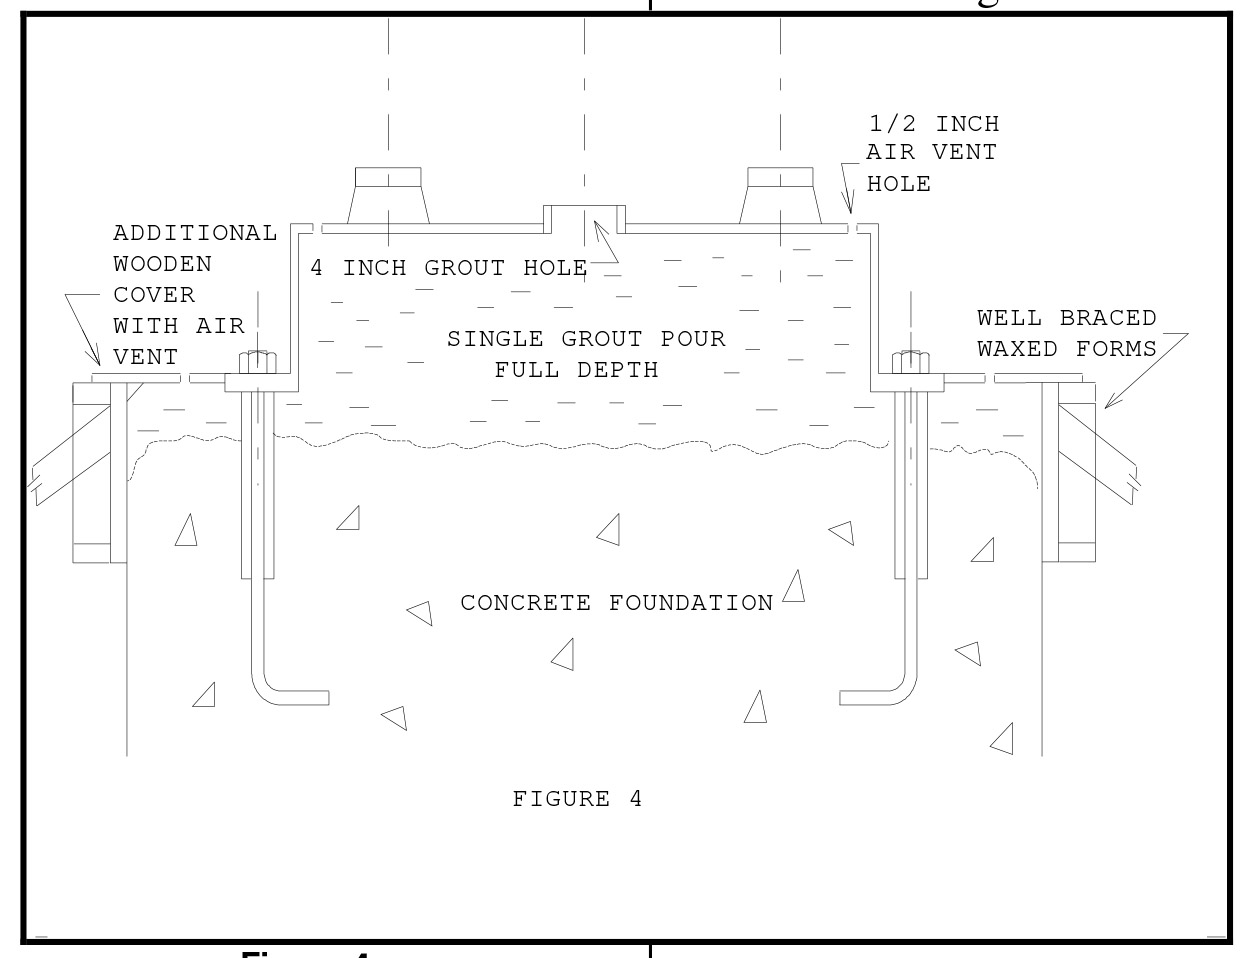
To accomplish a one-step operation, forms are constructed differently so both grout levels can be installed at the same time. This requires a form cover, precut to exactly fit the exterior exposed grout surface (see Figure 4), between the vertical wooden forms and the metal base skirt. This form, as with all of the wooden forms, should be waxed well so it can be removed from the grout surface.
This horizontal form cover must fit tightly so that as grout is poured into the center cavity through the 4" grout holes, it will withstand the head from the higher cavity level as it fills and also be tight enough so as not to let the grout leak. Vent holes are pre-drilled in the form cover on 12" centers to allow any air to escape that was forced under the flange as the cavity is filled. Once the air is expelled, these holes are plugged so the cavity can be completely filled.
This system has two obvious advantages over the two-step operation that is more commonly used today. First, the grouting is essentially a one-step operation that can be accomplished at one time without the delay of waiting for the first pour to harden. In some cases, this means completing the job on the same day.
The other advantage is that the pour is monolithic, and the possibility of a cold joint between pours is eliminated. With epoxy grouts, even waiting overnight has not really presented a "cold joint" bonding problem but could if allowed to go several days because of a weather delay. With cement grouts, which usually set up faster than epoxy grouts, it is possible to get a two-step operation done on the same day. Reports from the field indicate the one-step process gives excellent base plate contact as long as other good techniques are followed.
What are other good installation techniques? Many of these are common to grouting, in general, and have been covered in earlier newsletters. Important points worth mentioning again, though, are good pre-job planning, having enough proper mixers available so the flow of grout during installation is not interrupted, and starting from one end and filling continuously toward the other end so as to move the air ahead of the grout and out of a vent hole.
These points, and lots of common sense, go a long way towards getting consistently good results.
Dual Grout Pump Base Grouting
It is possible to have the best of both types of grouts: that is, cementitious and epoxy under the same base. This is accomplished by using an epoxy grout for the first pour on top of the concrete and using a cementitious grout inside the pump base cavity. This will give a very corrosive-resistant grout shoulder, which is likely to see spillage from the pump as well as good bottom flange support.
The expanding nature of flowable cementitious grouts that meet CRD C-621 make getting good base plate contact under the support area above the grout cavity easier to achieve than with an epoxy grout. Such cementitious grouts can be poured on top of the first epoxy pour as soon as the first pour is firm, and these grouts may even bond to the slightly tacky epoxy grout. As with any use of cementitious grouts for pump grouting, the fill and vent holes should be sealed with epoxy, anyway, so the cementitious grout inside is not exposed to process spillage from above. Also, the need for wet curing or curing agents on the lower grout shoulder is eliminated since the epoxy grout shoulder does not require such treatment. This combination of both epoxy and cementitious grout materials is easier to install than an all-epoxy installation and costs less because good cementitious grouts are less than half the cost of epoxy grouts.
A word of caution, though: this "hybrid" system will only work with a premium cementitious grout that will remain tight against the underside of the pump cavity over the life of the installation. A cheaper cementitious grout that may be suitable for a general grouting application may work fine under a building column where shrinkage over time of .001" to .003" would never be noticed. But it would not serve well, over time, under a metal pump base. If you choose this dual-type grout system, get documentation of the long term shrinkage of the product. CRD C-621 only covers the volume change of the grout during its plastic stage. For high RPM and high pressure pumps, the all-epoxy grout procedure is the best choice.
Repair Procedures
With anything as complex as pump grouting, it's natural that something will go wrong at some time. Most of the time, whatever the cause was, the problem will manifest itself as voids or hollow spots under the support plate over the grout cavity. These can be voids several inches thick or, more commonly, voids of a thickness of a fraction of an inch.
In any event, if noticed or found promptly, repairs can be accomplished with very little extra cost. It is a common practice to try to locate voids by tapping with a hammer, but even this can be misleading.
Unfortunately, there are no proven, non-destructive test methods being practiced in the field today. The only really valid test is to drill a small hole and confirm the hollow sound is indeed a void by visual inspection or by probing with a wire. In any event, that test hole can also be used to cure the problem, if one exists, by tapping it for a grease fitting. This can then serve as an injection port or vent port for an epoxy injection repair procedure.
If what caused the void, whether it was a placing technique or a material problem, was repeated on all pumps being installed at one time, chances are that the same problem will be found on each base. This has happened many times in the field, so being alert to this possibility and being knowledgeable in how to repair it by pressure injection can turn a lemon into lemonade.
In brief, pressure injection repairs are accomplished by drilling and tapping sufficient 1/8" pipe thread holes so the void or voids can be filled. A minimum of two holes into each void is required. If the void is as big as 10" to 18", then as many as five holes would be used, one in the center and the others at the edges.
Starting at the center, injection is started and continued until at least one hole shows a return. A grease fitting is then screwed into that tapped hole. Injection is continued until returns show at the other holes, and then they are closed with a grease fitting.
When all are thought full, the center fitting is removed and injection tried at each of the perimeter ports sequentially. Excess material should continue to flow out of the center hole. When further injection indicates no more is going under the plate, all the grease fittings are removed so the levels in all holes can be observed. In case there is slow leakage or bleeding into an adjacent void, re-injection can be accomplished before the epoxy injection liquid jells. Further detail on pressure grouting can be found in Issue 9 of the Grouting Technology Newsletter.
Pumping is done with a common grease gun without the end cap. By holding the cylinder vertically, additional mixed epoxy injection liquid can be poured in by a helper as the level falls. Be prepared with extra grease guns which probably will be thrown away at the end of the day.
The epoxy injection liquid you use can be the two liquid components of a standard epoxy machinery grout if those liquids will cure in a thin film. If not, special two-part liquid epoxy injection grouts are readily available.
The major difference is that a true injection grade epoxy grout will cure in the presence of water as it is used primarily for sealing cracks in concrete. The usual liquid and hardener components in an epoxy machinery grout are moisture sensitive and will work for a pump base repair since there should not be water in the voids. Either type epoxy liquid probably has a short pot life, less than 30 minutes, so mix small batches using the techniques described above. If the voids are suspected of being over 1" or so in depth, a filled epoxy injection grout (a three component mix), may have to
be substituted. If probing the depths with a wire at each hole indicates that more than 1/2 gallon of mixture will be required or that the depths are consistently over 1", then switch to a filled epoxy injection material. The extra filler of fine silica that is used will reduce the heat generated by the epoxy as it cures. An unfilled volume of mixed epoxy, for example: a 1/2 gallon, will get quite hot as it cures and can be very dangerous and cause the equipment base to distort. This same volume, spread out in a thin layer, cures to a good hard liquid "shim." Use common sense with these advanced grouting materials.
The success ratio, using epoxy injection, is very high. Epoxy injections are an excellent tool for eliminating vibration from a hollow sounding base plate.
Conclusion
From the above, it can be seen that good quality, long lasting grouting of pump bases can be achieved. Proper choice of materials, good installation techniques, and a well trained or supervised grout crew are the three major ingredients required. Not much was said about the human element, but this factor is just as important as materials and techniques. Skilled contractor crews are available, as are supervisors who can train in-house personnel or supervise the installation. �
¹ Malcolm G. Murray, Jr., "Better Pump Grouting," Hydrocarbon Processing Magazine, Feb. 1974 "How to Specify Better Pump Base Plates", Hydrocarbon Processing Magazine, Sept. 1973.
² Perry C. Monroe, Jr., "Installation and Grouting Techniques," Paper presented at the South Texas Section of ASME, Centrifugal Pump Engineering Seminar, Feb. 23, 1988.